0%

200

200 OK 请求成功
201 Created 已创建新资源
202 Accepted 已接受但未完成(异步处理)

300

301 Moved Permanently 资源(网页等)被永久转移到其它URL
302 Temporarily Moved / Found
303 See Other

400

400 Bad Request
401 Unauthorized 请求要求用户的身份认证
403 Forbidden 服务器理解请求客户端的请求,但是拒绝执行此请求
404 Not Found 请求的资源(网页等)不存在
406 Not Acceptable
409 Conflict
412 Precondition Failed
415 Unsupported Media Type

500

500 Internal Server Error 内部服务器错误
503 Service Unavailable

参考:
https://www.runoob.com/http/http-status-codes.html

1
2
3
4
5
6
7
8
9
10
11
12
13
14
15
16
17
18
19
20
21
22
23
24
25
26
27
28
29
30
31
32
33
34
35
36
37
38
39
40
41
42
43
44
45
46
47
48
49
50
51
52
53
54
55
56
57
58
100 "continue"
101 "switching protocols"
102 "processing"
200 "ok"
201 "created"
202 "accepted"
203 "non-authoritative information"
204 "no content"
205 "reset content"
206 "partial content"
207 "multi-status"
208 "already reported"
226 "im used"
300 "multiple choices"
301 "moved permanently"
302 "found"
303 "see other"
304 "not modified"
305 "use proxy"
307 "temporary redirect"
308 "permanent redirect"
400 "bad request"
401 "unauthorized"
402 "payment required"
403 "forbidden"
404 "not found"
405 "method not allowed"
406 "not acceptable"
407 "proxy authentication required"
408 "request timeout"
409 "conflict"
410 "gone"
411 "length required"
412 "precondition failed"
413 "payload too large"
414 "uri too long"
415 "unsupported media type"
416 "range not satisfiable"
417 "expectation failed"
418 "I'm a teapot"
422 "unprocessable entity"
423 "locked"
424 "failed dependency"
426 "upgrade required"
428 "precondition required"
429 "too many requests"
431 "request header fields too large"
500 "internal server error"
501 "not implemented"
502 "bad gateway"
503 "service unavailable"
504 "gateway timeout"
505 "http version not supported"
506 "variant also negotiates"
507 "insufficient storage"
508 "loop detected"
510 "not extended"
511 "network authentication required"

参考:https://koa.bootcss.com/#response

createElement 参数

1
2
3
4
5
6
7
8
9
10
11
12
13
14
15
16
17
18
19
20
21
22
23
24
25
26
// @returns {VNode}
createElement(
// {String | Object | Function}
// 一个 HTML 标签名、组件选项对象,或者
// resolve 了上述任何一种的一个 async 函数。必填项。
'div',

// {Object}
// 一个与模板中 attribute 对应的数据对象。可选。
{
// (详情见下一节)
},

// {String | Array}
// 子级虚拟节点 (VNodes),由 `createElement()` 构建而成,
// 也可以使用字符串来生成“文本虚拟节点”。可选。
[
'先写一些文字',
createElement('h1', '一则头条'),
createElement(MyComponent, {
props: {
someProp: 'foobar'
}
})
]
)

深入数据对象

1
2
3
4
5
6
7
8
9
10
11
12
13
14
15
16
17
18
19
20
21
22
23
24
25
26
27
28
29
30
31
32
33
34
35
36
37
38
39
40
41
42
43
44
45
46
47
48
49
50
51
52
53
54
55
56
57
58
59
60
61
62
63
{
// 与 `v-bind:class` 的 API 相同,
// 接受一个字符串、对象或字符串和对象组成的数组
'class': {
foo: true,
bar: false
},
// 与 `v-bind:style` 的 API 相同,
// 接受一个字符串、对象,或对象组成的数组
style: {
color: 'red',
fontSize: '14px'
},
// 普通的 HTML attribute
attrs: {
id: 'foo'
},
// 组件 prop
props: {
myProp: 'bar'
},
// DOM property
domProps: {
innerHTML: 'baz'
},
// 事件监听器在 `on` 内,
// 但不再支持如 `v-on:keyup.enter` 这样的修饰器。
// 需要在处理函数中手动检查 keyCode。
on: {
click: this.clickHandler
},
// 仅用于组件,用于监听原生事件,而不是组件内部使用
// `vm.$emit` 触发的事件。
nativeOn: {
click: this.nativeClickHandler
},
// 自定义指令。注意,你无法对 `binding` 中的 `oldValue`
// 赋值,因为 Vue 已经自动为你进行了同步。
directives: [
{
name: 'my-custom-directive',
value: '2',
expression: '1 + 1',
arg: 'foo',
modifiers: {
bar: true
}
}
],
// 作用域插槽的格式为
// { name: props => VNode | Array<VNode> }
scopedSlots: {
default: props => createElement('span', props.text)
},
// 如果组件是其它组件的子组件,需为插槽指定名称
slot: 'name-of-slot',
// 其它特殊顶层 property
key: 'myKey',
ref: 'myRef',
// 如果你在渲染函数中给多个元素都应用了相同的 ref 名,
// 那么 `$refs.myRef` 会变成一个数组。
refInFor: true
}

超出部分显示省略号

1
2
3
overflow: hidden;
text-overflow: ellipsis;
white-space: nowrap;

参考:https://blog.csdn.net/zhumengzj/article/details/80801556

三角形

Triangle Up

1
2
3
4
5
6
7
8
9

#triangle-up {
    width: 0;
    height: 0;
    border-left: 50px solid transparent;
    border-right: 50px solid transparent;
    border-bottom: 100px solid red;
}

Triangle Top Left

1
2
3
4
5
6
7
8

#triangle-topleft {
    width: 0;
    height: 0;
    border-top: 100px solid red;
    border-right: 100px solid transparent;
}

下载安装脚本

  1. 使用命令下载,并重命名为 composer-setup.php
    1
    php -r "copy('https://install.phpcomposer.com/installer', 'composer-setup.php');"
  2. 浏览器下载,并重命名为 composer-setup.php
    直接访问以下地址
    https://install.phpcomposer.com/installer

执行安装过程

此步骤会生成 composer.phar

1
php composer-setup.php

删除安装脚本

可以手动删除,也可以使用以下命令删除

1
php -r "unlink('composer-setup.php');"

局部安装

将上述步骤生成的 composer.phar 文件复制到任意目录(比如项目根目录下),然后通过 php composer.phar 指令即可使用 Composer 了!

全局安装(windows)

  1. 将 composer.phar 复制到 PHP 的安装目录下面,也就是和 php.exe 在同一级目录。
  2. 在 PHP 安装目录下新建一个 composer.bat 文件,并将下列代码保存到此文件中。
    @php "%~dp0composer.phar" %*
  3. 最后重新打开一个命令行窗口试一试执行 composer –version 看看是否正确输出版本号。

参考
https://pkg.phpcomposer.com/#how-to-install-composer

安装

pip install virtualenvwrapper-win

创建

mkvirtualenv spider

mkvirtualenv -p (特定版本python) spider

退出

deactivate

进入

workon spider

删除

删除目录就可以
windows下默认在 C:/Users/xxx/Envs

  1. failed to open stream: Permission denied

可能原因:没有目录权限
解决方案:更改目录所有者为www

1
# chown -R www:www folername
  1. failed to open stream: No such file or directory
1
# composer install

背景

centos7.5
使用宝塔安装php7.3
宝塔安装的 php 没有 fileinfo 扩展

安装扩展

下载扩展

可以单独下载扩展,也可以下载整个php

下载整个php:把版本换为你需要的版本

1
# wget -O php-7.3.19.tar.gz http://cn2.php.net/get/php-7.3.19.tar.gz/from/this/mirror

解压

1
# tar -zxvf php-7.3.19.tar.gz

进入扩展目录

1
# cd php-7.3.19/ext/fileinfo/

生成配置

  1. 在扩展目录 (fileinfo) 下运行你安装的 php bin 目录下的 phpize
1
[fileinfo]# /www/server/php/73/bin/phpize
  1. 配置
1
[fileinfo]# ./configure --with-php-config=/www/server/php/73/bin/php-config

编译并安装

1
# make && make install

更改配置文件 php.ini

把 extension=fileinfo 前面的分号去掉
也可以使用命令,类似

1
# echo "extension = oauth.so" >> /www/server/php/73/etc/php.ini

重载php

1
# /etc/init.d/php-fpm-73 reload

检查是否安装成功

1
# php -m|grep -i fileinfo

参考文章1:https://blog.csdn.net/qivan/article/details/64439911
参考文章2:https://www.php.cn/topic/bt/429078.html

docker 命令

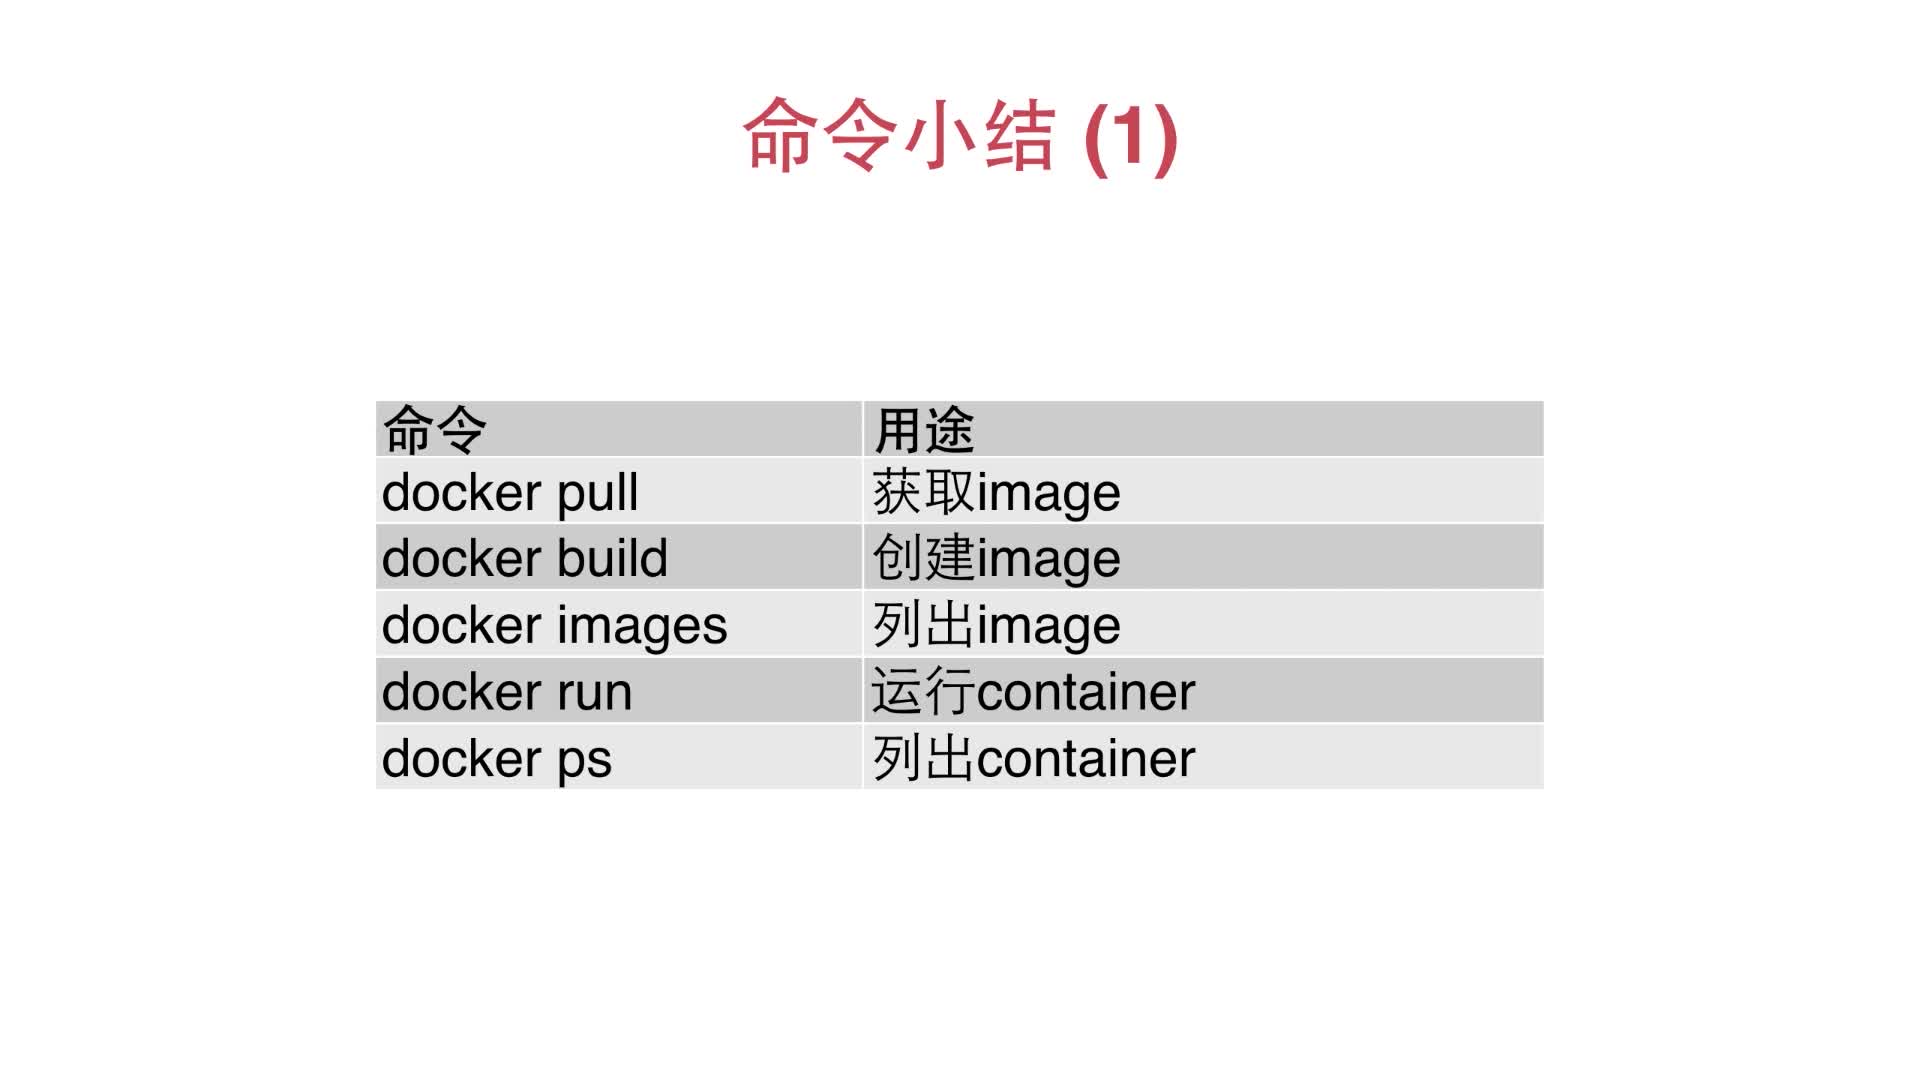
docker pull

获取 image

docker build

创建 image

docker images

列出 images

docker tag

1
docker tag 旧镜像名  新镜像名 

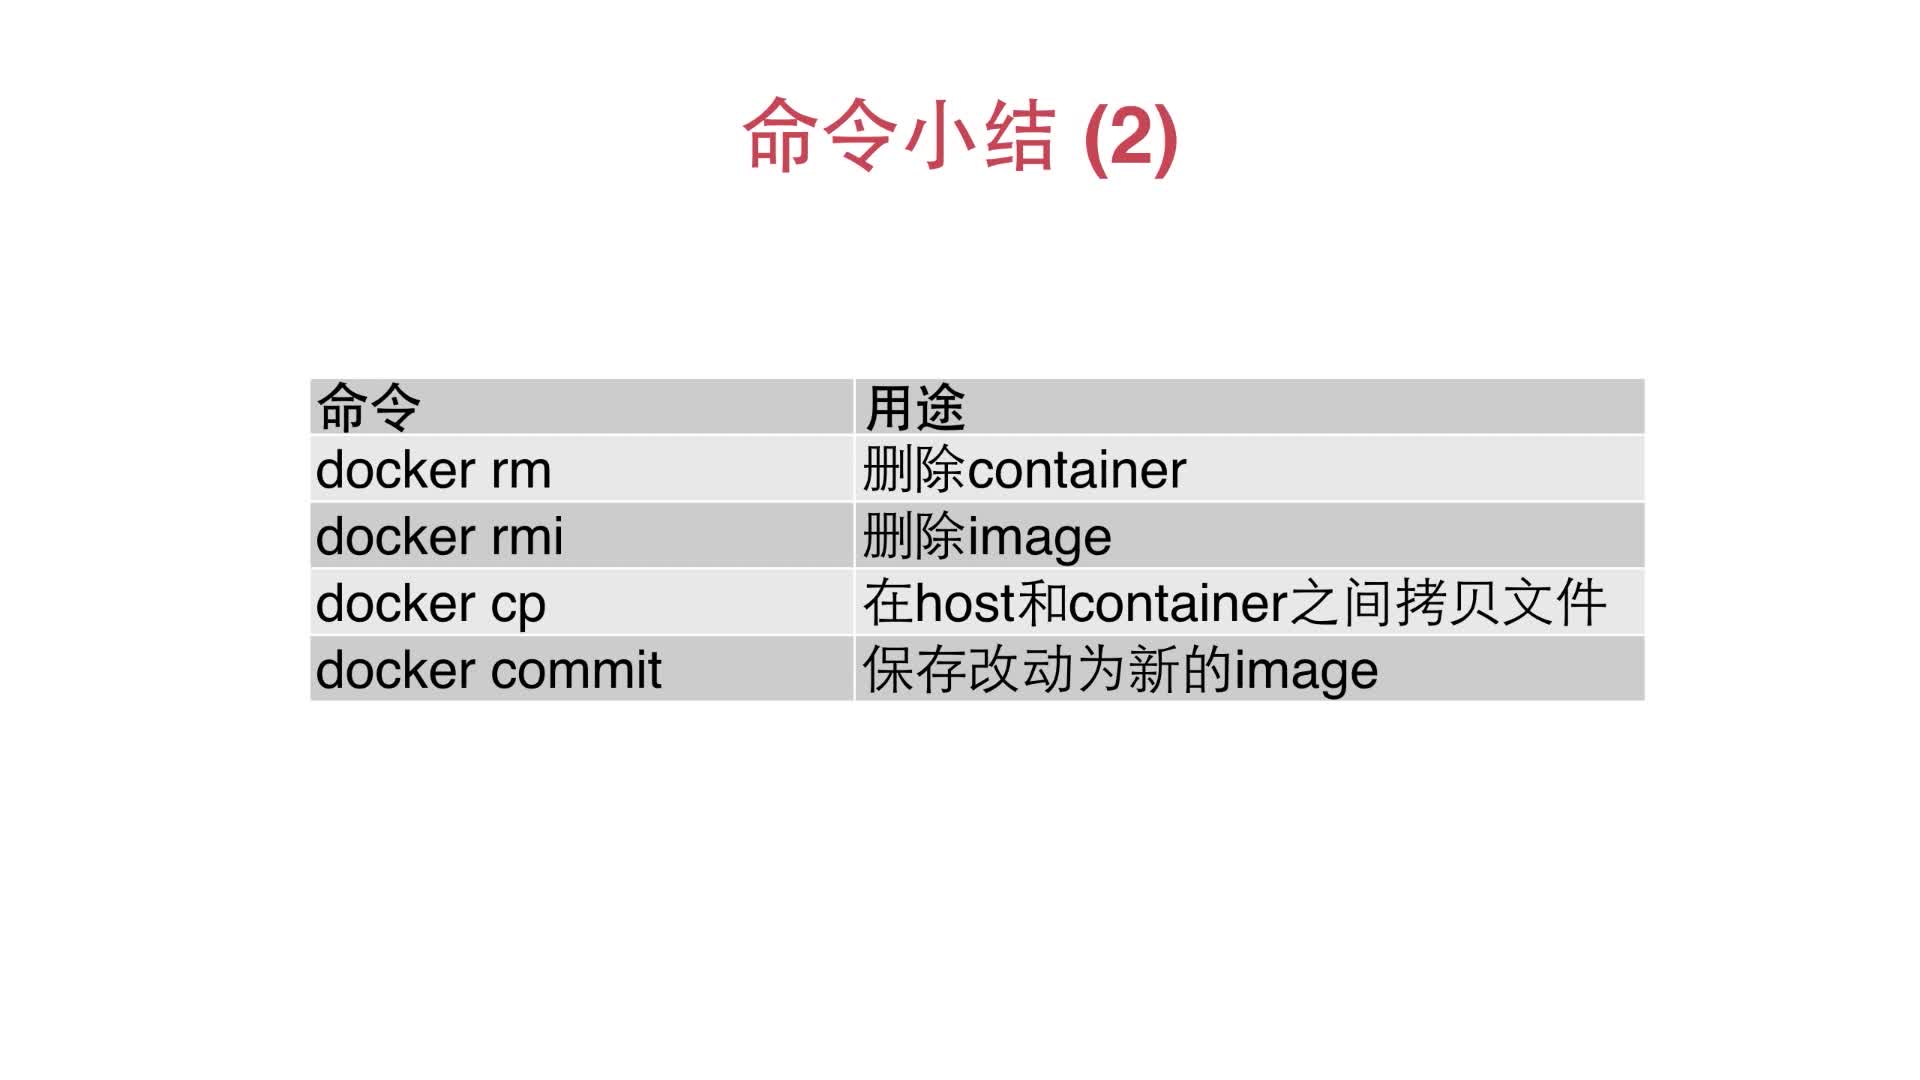
docker rmi

删除 image

docker commit

保存改动为新的 image

docker run

运行 container

docker inspect

获取容器/镜像的元数据。

1
docker inspect 容器名称 查看容器IP

docker ps

列出运行中的 containers

1
docker ps -a #列出所有的 containers

docker start

启动 containers

docker stop

停止 containers

docker rm

删除 container

docker cp

在 host 和 container 之间拷贝文件

将主机 /www/test 目录拷贝到容器 96f7f14e99ab 的 /www 目录下。

1
docker cp /www/test 96f7f14e99ab:/www/

将容器 96f7f14e99ab 的 /www 目录拷贝到主机的 /tmp 目录中。

1
docker cp  96f7f14e99ab:/www /tmp/

docker 命令1
docker 命令2

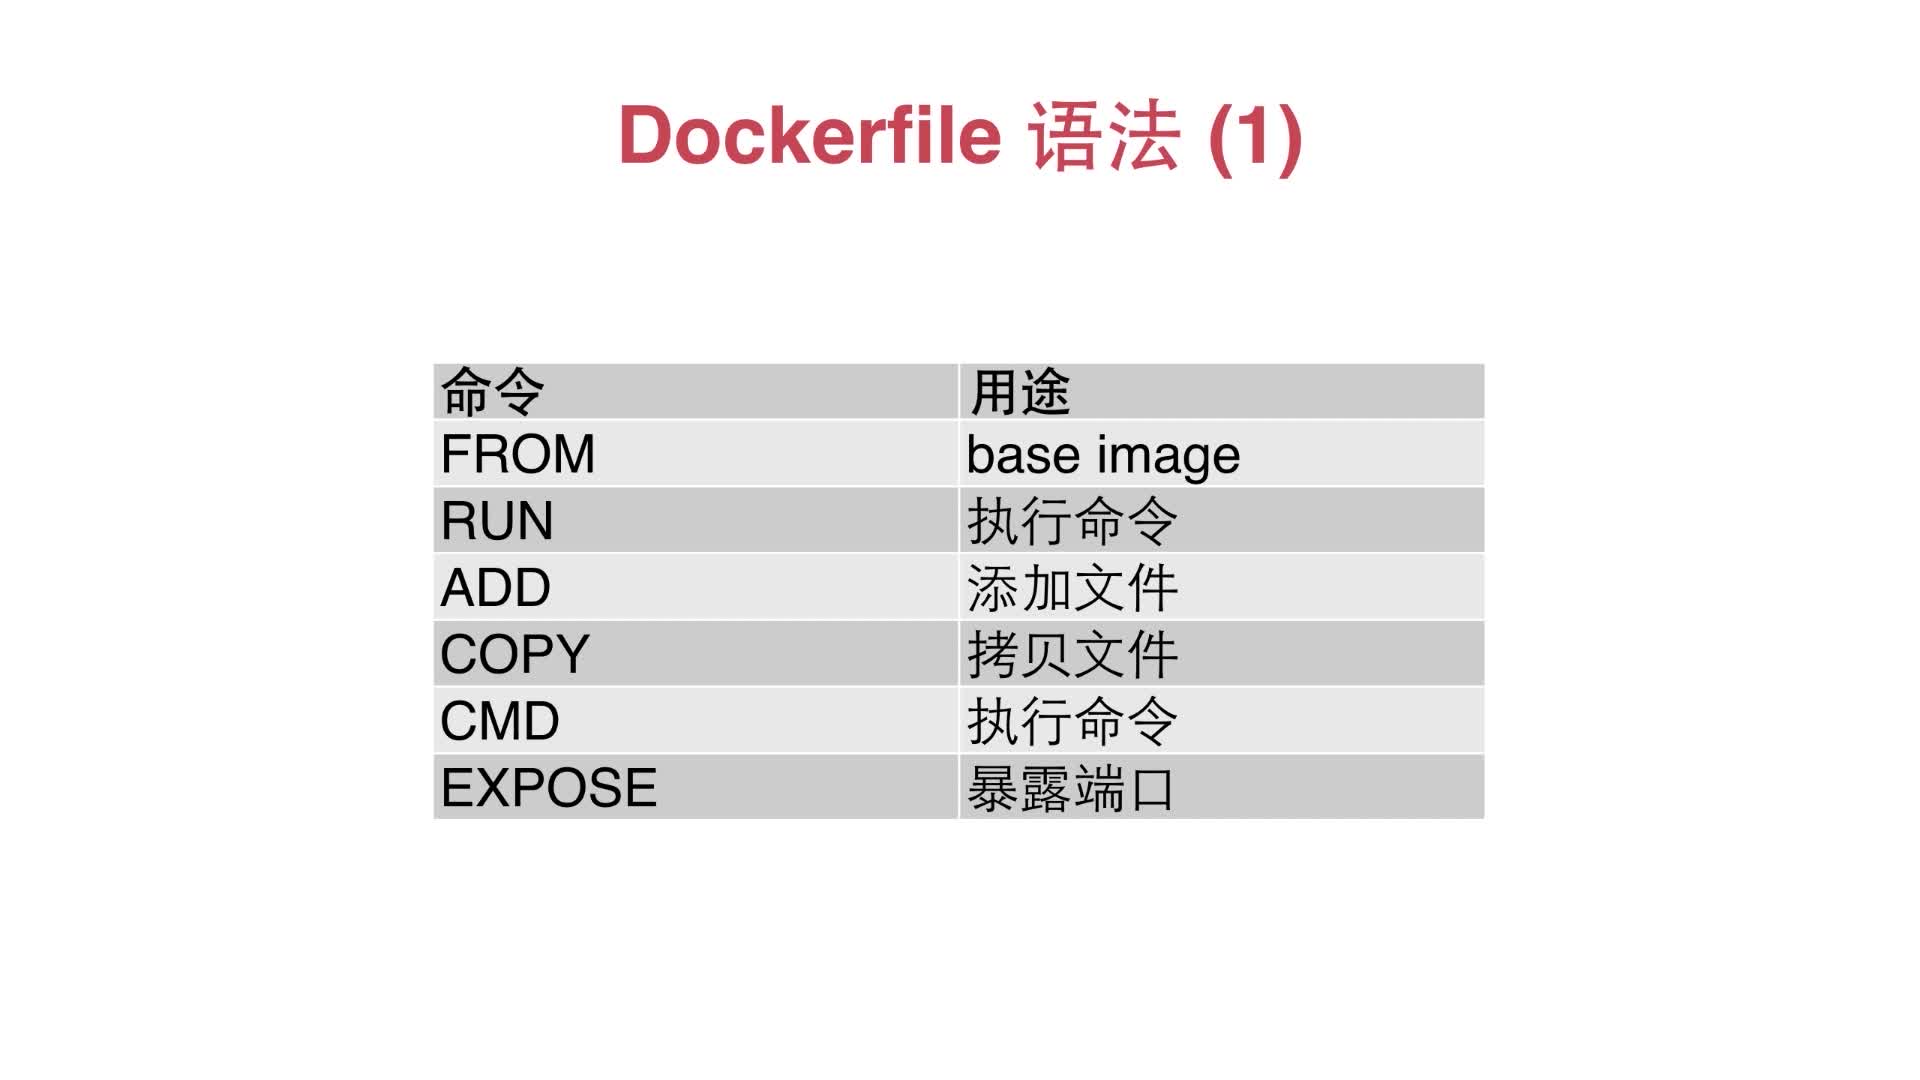
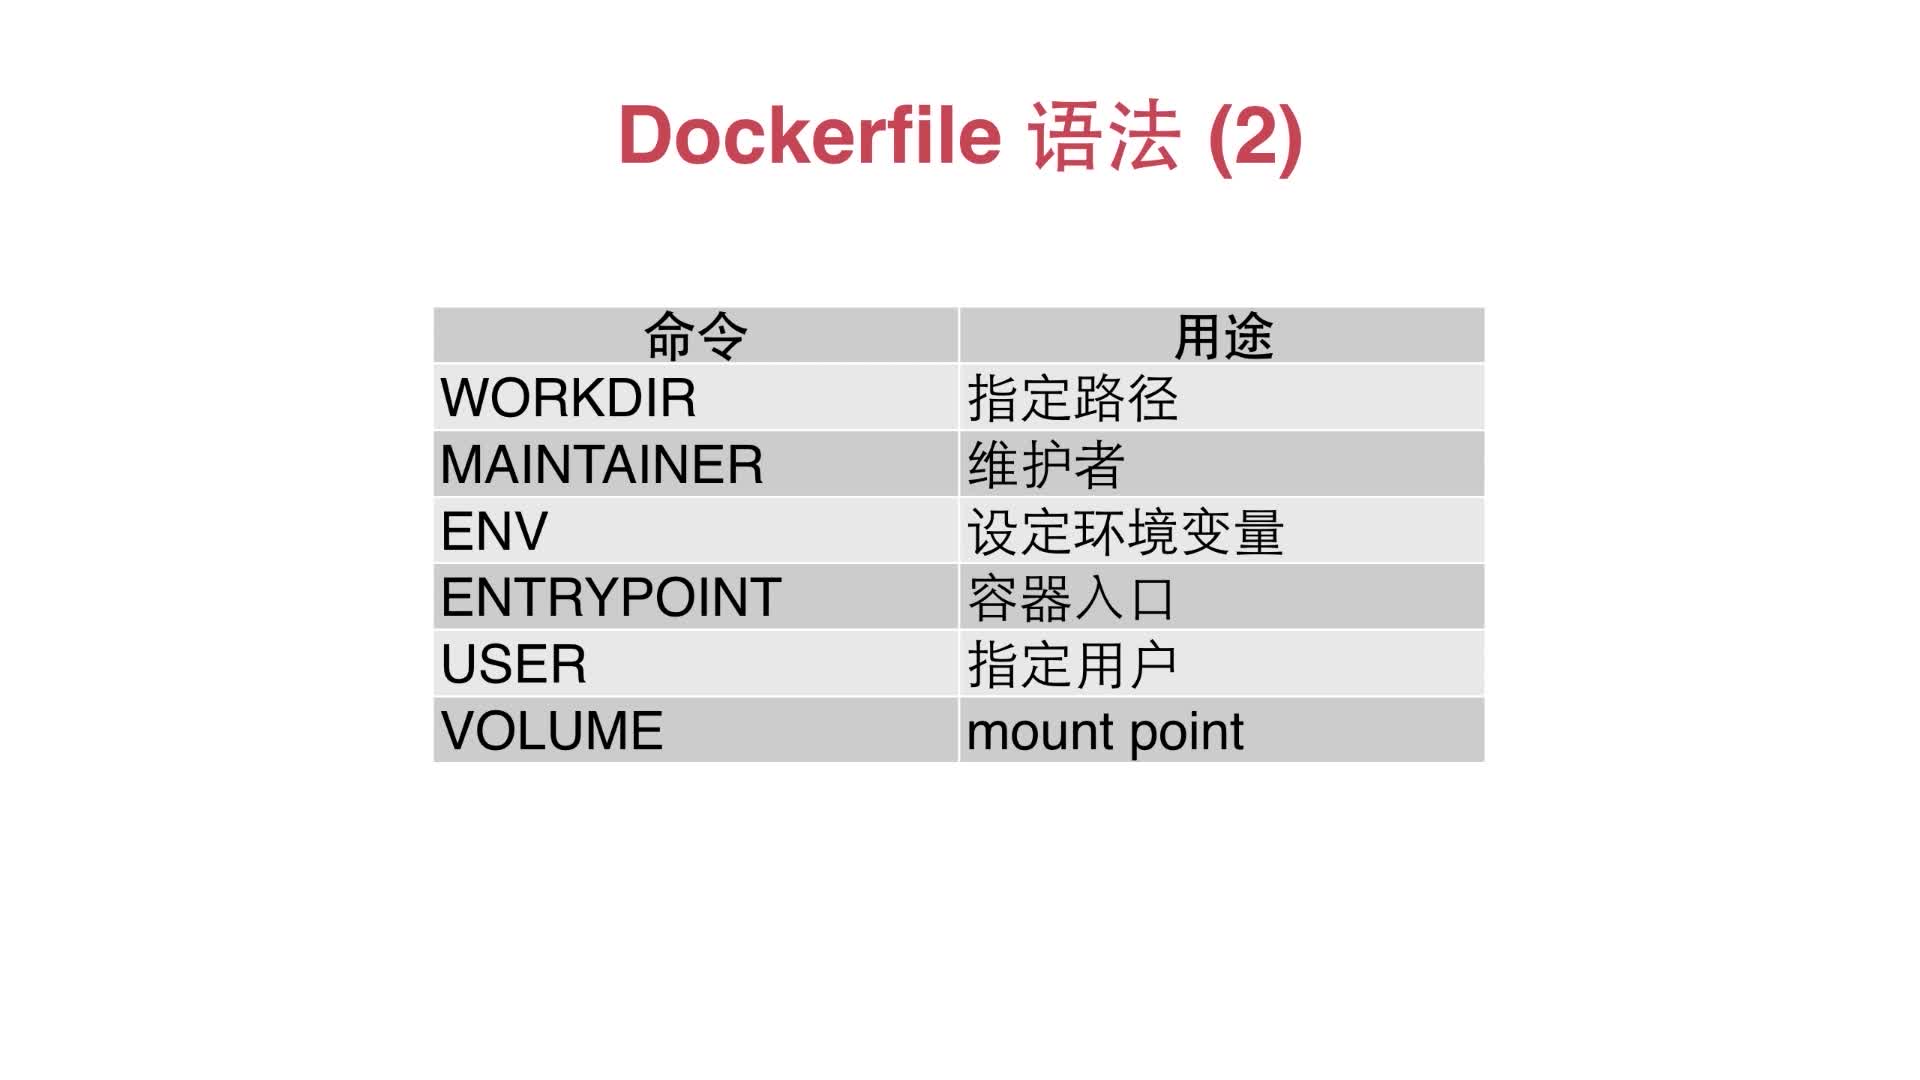
Dockerfile 语法

Dockerfile 语法1
Dockerfile 语法2

网络

bridge 网络
host 网络

参考:https://www.jb51.net/article/149173.htm

创建用户

  1. npm 官网创建
  2. npm add user 创建

登录

1
npm login

查看当前登录账户

1
2
npm who am i
npm whoami

发布

1
2
npm publish --access=public # 首次发布
npm publish

删除

npm包发布,通常不建议删除(假如有某某用户已经使用了你的npm包,这时候删除npm包是很没道理的)。

1
npm unpublish 依赖包名称 --force

版本管理

1
2
3
4
5
6
7
npm version prerelease
npm version prepatch
npm version preminor
npm version premajor
npm version patch
npm version minor
npm version major

npm version

常见报错

401

如果提示 401 Unauthorized - GET https://registry.npmjs.org/-/whoami,请先登录

403

403 Forbidden - PUT https://registry.npmjs.org/xxxx - You do not have permission to publish "xxx"
可能包名冲突

  1. 更换包名
  2. 添加 scope,如:@fyzhu/xxx

402

402 Payment Required - PUT https://registry.npmjs.org/xxx - You must sign up for private packages
发私有包需要付费,可以发公共包

1
npm publish --access=public 

数据结构(线性结构/树形结构/图结构)

  1. 数组 array
  2. 链表(动态数据结构)
  3. 散列表 hashtable
  4. 栈 stack(后进先出)(系统栈-子函数)
  5. 队列 queue(先进先出)(循环队列,对普通队列进行优化)
  6. 堆 heap
  7. 树 tree
  8. 二叉树 binary tree(动态数据结构)
  9. 二分搜索树 binary search tree(每个节点的值大于其左子树所有节点的值,小于其右子树说有节点的值)(存储的元素必须有可比较性)
  10. 集合 set (每个元素只能存在一次) (去重)(使用二分搜索树实现)
  11. 映射 map (key value)
  12. 优先队列 Priority Queue (使用堆可以高效实现)
  13. 二叉堆 binary heap (使用树实现的堆,是一棵完全二叉树)(最大堆父节点的值大于子节点的值)(最小堆)(用数组可以实现)
  14. 满二叉树
  15. 完全二叉树

查找算法

  1. 简单查找
  2. 二分查找

排序算法

  1. 选择排序(selection sort)
  2. 插入排序(insertion sort)
  3. 希尔排序(shell sort)
  4. 快速排序(Quick sort) 平均时间复杂度 O(nlogn),最坏时间复杂度 O(n*n)
  5. 归并排序(merge sort) 平均时间复杂度 O(nlogn),采用二分法,空间复杂度 O(n)
  6. 堆排序(heap sort)
  7. 冒泡排序(bubble sort)
  8. 计数排序(counting sort)