简单说,微前端就是把一个大的前端项目分解为多个小的前端项目。
前端项目主要是网站开发,所以微前端就是把一个大网站项目分解为多个小网站项目。
至于如何分解,一般有三种方案
- iframe
- web component
- 自研框架
各种方案优劣对比
简单说,微前端就是把一个大的前端项目分解为多个小的前端项目。
前端项目主要是网站开发,所以微前端就是把一个大网站项目分解为多个小网站项目。
至于如何分解,一般有三种方案
各种方案优劣对比
1 |
|
postMessage 可用于解决以下方面的问题:
1 | otherWindow.postMessage(message, targetOrigin, [transfer]); |
otherWindow
其他窗口的一个引用,比如 iframe 的 contentWindow 属性、执行 window.open 返回的窗口对象、或者是命名过或数值索引的 window.frames。
message
要发送的数据。它将会被结构化克隆算法序列化,所以无需自己序列化(部分低版本浏览器只支持字符串,所以发送的数据最好用JSON.stringify() 序列化)。
targetOrigin
通过 targetOrigin 属性来指定哪些窗口能接收到消息事件,其值可以是字符串“*”(表示无限制)或者一个 URI(如果要指定和当前窗口同源的话可设置为”/“)。在发送消息的时候,如果目标窗口的协议、主机地址或端口号这三者的任意一项不匹配 targetOrigin 提供的值,那么消息就不会发送。
1 | window.addEventListener("message", (event)=>{ |
event 的属性有:
————————————————
版权声明:本文为CSDN博主「huangpb0624」的原创文章,遵循CC 4.0 BY-SA版权协议,转载请附上原文出处链接及本声明。
原文链接:https://blog.csdn.net/huangpb123/article/details/83692019
最近看光哥的文章,说 Express 是洋葱模型。
我记得 Koa 是洋葱模型,而且这是其与 Express 不同的地方之一。
于是搜索引擎搜索了一通,只有说 Koa 是洋葱模型的,没有说 Express 是洋葱模型的。
而且一般都会提供下面的代码证明 Koa 是洋葱模型。
1 | // koa-app.js |
控制台打印如下
1 | 第一层洋葱 - 开始 |
看样子真像那么回事
于是我用 Express 试了一下
1 | var express = require("express"); |
控制台打印和 koa 的例子是一样的
什么,难道 Express 也是洋葱模型
其实,以上例子并不能说明 Koa 是洋葱模型,洋葱模型的关键是,在请求返回之前,你的请求是不是经过中间件两次,而且按照先进后出的顺序。
Koa 模型
进洋葱 -> 出洋葱 -> 返回请求
Express 模型
进洋葱 -> 返回请求 -> 出洋葱
以下代码才真正能体现 Koa 的洋葱模型
1 | const Koa = require("koa2"); |
浏览器显示结果
1 | 第一层洋葱 - 开始 |
1 | var express = require("express"); |
浏览器显示
1 | 第一层洋葱 - 开始 |
因为 Express 先返回数据,再出洋葱,出洋葱的过程就没有意义了,因为结果已经返回给前端了,在出洋葱的过程里已经无法改变了。
但 Koa 是在出洋葱之后返回请求,进洋葱,出洋葱都可以改变返回的请求。
所以 Express 不算是洋葱模型。
小数的表示分为「定点法」和「浮点法」
其实,整数和小数的主要区别,我们可以不规范地理解为是否存在小数点,对吧?(其实整数也是有小数点的,我们这里暂且这么理解)那么要表示小数,只需要在整数表示的基础上,加一个小数点,不就可以了吗?没错,这就是定点数的思路。
定点数使用二进制,小数点的位置是事先约定好的,在使用的过程中不能改变,这也是定点数的名称的由来。有的同学可能会问了,那么,小数如何从十进制换成定点数呢?不着急,且看下面的例子:
其实很简单,和整数部分的完全相反。连续将小数部分的值乘以2,对于每一次得到的数,若整数为0,则顺序记下一个0,若整数突破了1,则记下1,然后整数部分重置为0,小数部分继续重复上述操作,直到小数部分为0为止。就像下面这样:
十进制的0.125
0.125*2=0.25 (记下0)
0.25*2=0.5 (记下0,则目前为00)
0.5*2=1.0 (整数部分为1,记下1,则目前为001)
小数部分为0,转换结束(这里是刚好结束,若整数位进一后小数部分还有剩余,则把整数部分变成0再继续重复上面的算法)
则十进制0.125的二进制形式为0.001
二进制 101.011 转化为十进制
一般在现在计算机的应用中,定点数一般只有两种情况,第一种是小数点在符号位之后,也就是表示纯小数,第二种是在最后,也就是表示整数。这种表示方法的范围并不大,如果需要表示类似于这样的数值的话,那么用定点数的话就会占很大的空间。(毕竟你要很多很多个0才行,对吧)于是乎,我们的先人又开始秀智商了。
表示一组数,0.123,1.23,12.3,123
如果此时你用定点数来表示的话,你会发现,这四组数字的表示方法完全不同。但是,我们的数学经验却又告诉我们,这几个数字其实是可以用一种通式来表示的,你应该已经想到了,就是科学计数法。如果使用科学计数法,那么这几组数字的通式可以表示为。貌似比什么定点数方便多了。
但是,我们知道,计算机是用来处理二进制的,那么,我们在二进制里面,可不可以打造一套类似于科学计数法的思路来表示小数呢——这就是浮点数的基本思路。浮点数的表示方法有点类似科学计数法,但是又比科学计数法要复杂。
参考:
https://blog.csdn.net/jarvan5/article/details/115012434
https://www.jianshu.com/p/104f53c663c9
物理单位
1 pt = 1/72 inch
1 inch = 72 pt
72 pt = 96 px
绝对长度单位,多用于打印
1 inch = 2.54 cm
1px 问题
获取设备像素比
js
window.devicePixelRatio
css
-webkit-min-device-pixel-ratio
设备像素比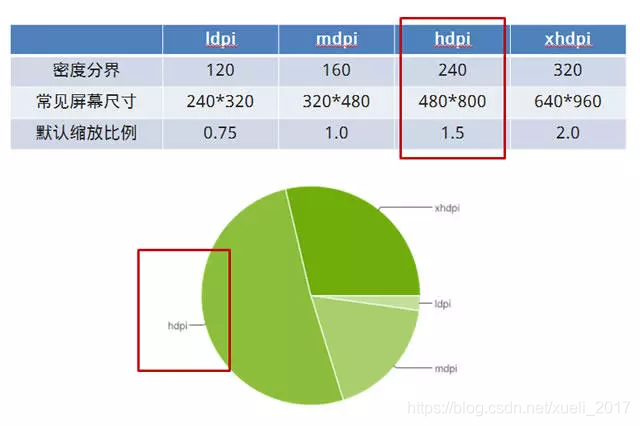
window.devicePixelRatio是设备物理像素和设备独立像素(device-independent pixels,dips)之间的比率。是一个约数?
window.devicePixelRatio = 物理像素 / 设备独立像素
设备独立像素(Device Independent Pixel):与设备无关的逻辑像素
css 像素是逻辑像素,并不是真实像素
Windows / Mac 电脑都可以设置设备独立像素
和 ppi 基本相同
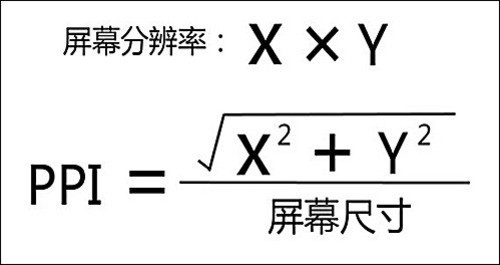
ppi在120-160之间的手机被归为低密度手机,160-240被归为中密度,240-320被归为高密度,320以上被归为超高密度(例如苹果公司的Retina显示屏)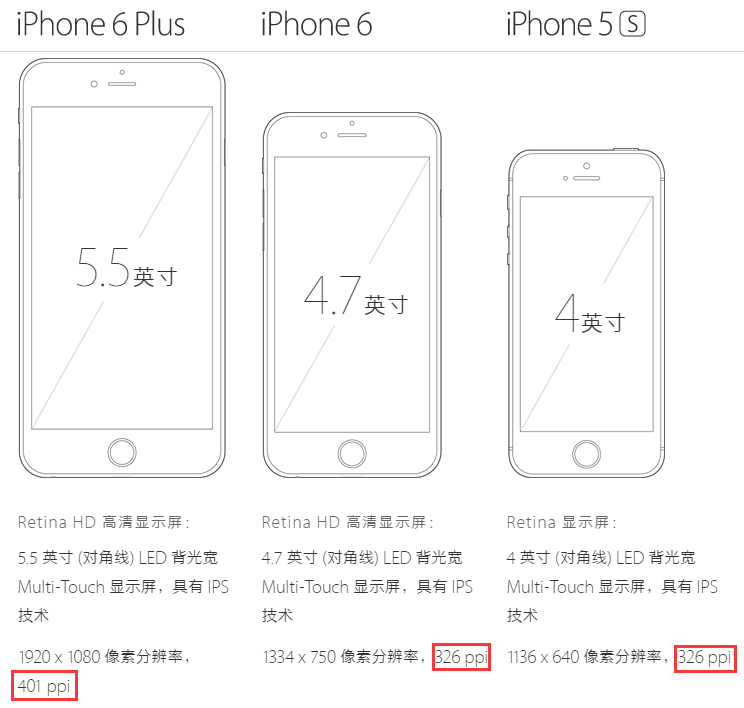
CSS 只与设备独立像素有关系,尺寸相同,设备独立像素相同的屏幕,网页上的同一张图片显示的尺寸是相同的,只不过清晰度会有所不同。所以会有二倍图,三倍图。
宽 100px 的图片在 1:1 的屏幕上css设置为 100px,在 2:1 的屏幕上可以使用200px 的图片,css 同样设置为 100px 。
设备独立像素 (DIP) 是与设备无关的,可以调整的逻辑像素。
font-weight可取值:100~900和normal、bold、bolder、lighter。
字体所拥有的字重的数量实际上很少存在满足有9个字重刚好跟100~900的CSS字重一一对应的情况,通常字体拥有的字重数量为4至6个。
不必担心,起码400和700对应的字重至少是每种字体必备的,譬如常见的 Arial、Helvetica、Georgia等等,只有400(normal)和700(bold)。
400 等同于 normal,而 700 等同于 bold。
bolder、lighter表示其字重值是基于从其父元素继承而来的字重计算所得的,与normal、bold所代表的字重并无关系。
参考
作者:人不中二枉少年
链接:https://www.jianshu.com/p/f9c6f9729fbb
来源:简书
著作权归作者所有。商业转载请联系作者获得授权,非商业转载请注明出处。
为什么 forEach 不行,而 普通 for 循环 和 for…of 却正常呢?
我们得先从 forEach 的源码 看起:
1 | // Production steps of ECMA-262, Edition 5, 15.4.4.18 |
摘抄最重要的部分:
1 | /* |
可以看到 callback.call(T, kValue, k, O); 这一句,callback 其实是我们传入的一个被 async 封装的 promise 对象,而 Array.prototype.forEach 内部并未对这个 promise 对象做任何处理,只是忽略它。
如果我们尝试把 Array.prototype.forEach 改造一下,让它不要忽视,就可以达到效果了,如下:
1 | Array.prototype.forEach = async function(callback/*, thisArg*/) { |
你总不能去侵入式的改造Array.prototype.forEach吧!所以最简单的办法就是抛弃 forEach,使用 for…of 或者 for 循环!
Emoji Raw Emoji Code Description
🎉 :tada: Initial Commit
✨ :sparkles: when introducing New Features
🐎 :racehorse: when improving performance
⚡ :zap: when introducing Backward-InCompatible Features, maybe with @CHANGED Comment Tag
🚀 :rocket: Anything related to Deployments/DevOps
📚 :books: when writing docs
🎨 :art: when improving the format/structure of the code
📝 :memo: Add or update documentation.
📝 :pencil: when performing minor changes/fixing the code or language
🐛 :bug: when reporting a bug, with @FIXMEComment Tag
🔨 :hammer: when refactoring code
🔧 :wrench: Add or update configuration files.
💄 :lipstick: when improving UI/Cosmetic
💅 :nail_care: style
🍻 :beers: Write code drunkenly.
📰 :newspaper: when creating a new file
🚑 :ambulance: when fixing a bug
🐧 :penguin: when fixing something on Linux
🍎 :apple: when fixing something on Mac OS
🏁 :checkered_flag: when fixing something on Windows
🔥 :fire: when removing code or files, maybe with @CHANGED Comment Tag
🚜 :tractor: when change file structure. Usually together with 🎨
☔ :umbrella: when adding tests
🔬 :microscope: when adding code coverage
💚 :green_heart: when fixing the CI build
🔒 :lock: when dealing with security
⬆️ :arrow_up: when upgrading dependencies
⬇️ :arrow_down: when downgrading dependencies
⏩ :fast_forward: when forward-porting features from an older version/branch
⏪ :rewind: when backporting features from a newer version/branch
👕 :shirt: when removing linter/strict/deprecation warnings
♿ :wheelchair: when improving accessibility
🌐 :globe_with_meridians: when dealing with globalization/internationalization/i18n/g11n
🚧 :construction: WIP(Work In Progress) Commits, maybe with @REVIEW Comment Tag
💎 :gem: New Release
🥚 :egg: New Release with Python egg
🎡 :ferris_wheel: New Release with Python wheel package
🔖 :bookmark: Version Tags
🔈 :speaker: when Adding Logging
🔇 :mute: when Reducing Logging
💡 :bulb: New Idea, with @IDEA Comment Tag
❄️ :snowflake: changing Configuration, Usually together with 🐧 or 🎀 or 🚀
🎀 :ribbon: Customer requested application Customization, with @HACK Comment Tag
🐘 :elephant: PostgreSQL Database specific (Migrations, Scripts, Extensions, …)
🐬 :dolphin: MySQL Database specific (Migrations, Scripts, Extensions, …)
🍃 :leaves: MongoDB Database specific (Migrations, Scripts, Extensions, …)
🏦 :bank: Generic Database specific (Migrations, Scripts, Extensions, …)
🐳 :whale: Docker Configuration
🤝 :handshake: when Merge files
🍒 :cherries: when Commit Arise from one or more Cherry-Pick Commit(s)
参考
链接:https://www.jianshu.com/p/0bfdf5c41696
https://gitmoji.dev/
https://github.com/slashsBin/styleguide-git-commit-message
参考 https://www.jianshu.com/p/d22baeae50ea
或 curl 报错 wrong version number
修改 nginx 配置,nginx -t 查看配置文件所在路径
listen 443 ssl;
输入 thisisunsafe
参考: https://segmentfault.com/a/1190000021843971
caddy